Want to turn organic waste into a profitable business?
You’re in the right place.
In this guide, as a professional organic fertilizer production line manufacturer, I’ll show you exactly how to make organic fertilizer commercially.
In fact, these are the same steps that successful fertilizer manufacturers use to produce thousands of tons of organic fertilizer every year.
So if you’re serious about starting a commercial organic fertilizer operation, you’ll love this guide.
Let’s dive right in.
What You’ll Learn
Here’s a quick preview of what I’ll cover:
- The essential equipment you need (and what you can skip)
- Raw material sourcing secrets
- Step-by-step production process
- Quality control measures that actually matter
- Marketing and distribution strategies
But first, let me share something interesting…
Why Commercial Organic Fertilizer Production is Booming
The organic fertilizer market is exploding right now.
In fact, the global organic fertilizer market is expected to hit $15.8 billion by 2025.
Why?
Simple: farmers are ditching chemical fertilizers like crazy.
And they need alternatives. Fast.
That’s where commercial organic fertilizer production comes in.
How to Make Organic Fertilizer Commercially
Step 1: Understand Your Raw Materials
Here’s the thing:
Your raw materials make or break your fertilizer quality.
So let’s start there.
Best Raw Materials for Commercial Production
The most common raw materials include:
Animal Waste
- Chicken manure (highest nitrogen content)
- Cow dung (most balanced nutrients)
- Pig waste (good phosphorus levels)
- Horse manure (excellent texture)
Plant Materials
- Crop residues
- Sawdust
- Rice husks
- Sugarcane bagasse
Other Organic Waste
- Food processing waste
- Municipal organic waste
- Biogas slurry
Pro tip: Mix different materials to create a balanced nutrient profile.
For example, combining chicken manure (high nitrogen) with rice husks (high carbon) creates the perfect C:N ratio for composting.
Step 2: Set Up Your Production Facility
Now for the fun part:
Building your fertilizer plant.
But hold on…
You don’t need a massive facility to start.
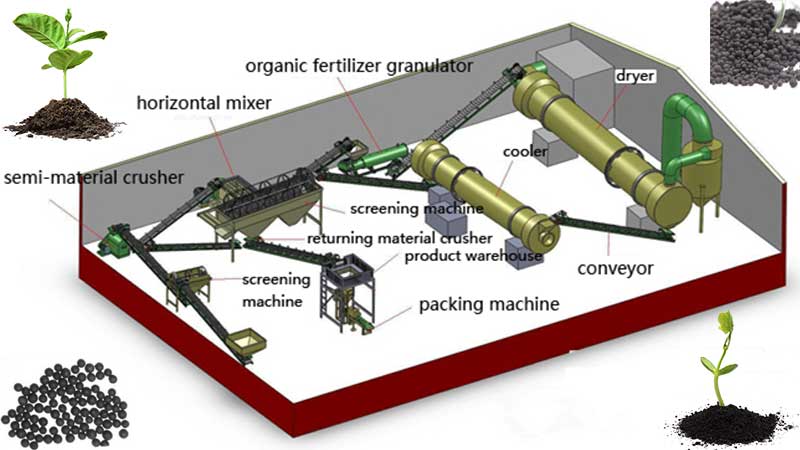
Essential Equipment You Actually Need
Here’s what you MUST have:
1. Compost Turner
This is non-negotiable.
A good compost turner can process 500-3000 tons per hour, depending on the model.
Without it? You’re looking at months of manual turning.
With it? Your composting time drops to 15-20 days.
2. Crusher/Grinder
After composting, you need to crush the material into uniform particles.
Why does this matter?
Because uniform particles = consistent product quality.
3. Screening Machine
This separates the fine powder from larger chunks.
The oversized material? Send it back to the crusher.
The fine stuff? That’s your product.
4. Packaging Machine
Unless you’re selling in bulk, you need automated packaging.
A decent packaging machine handles 10-20 bags per minute.
Optional (But Helpful) Equipment
Granulator: Turns powder into pellets. Great for premium products.
Dryer: Reduces moisture content for longer shelf life.
Mixer: Blends different materials or adds micronutrients.
Step 3: Master the Composting Process
This is where the magic happens.
And by magic, I mean controlled decomposition.
The Commercial Composting Method
Here’s my proven process:
Week 1-2: Initial Decomposition
Mix your raw materials to achieve:
- Moisture: 50-60%
- C:N ratio: 25-30:1
- pH: 6.5-8.0
Turn the pile every 2-3 days.
Temperature should hit 55-65°C within 48 hours.
Week 3-4: Active Composting
Continue turning every 3-4 days.
Monitor temperature daily.
If it drops below 50°C, add nitrogen (like urea).
Too hot (above 70°C)? Add water and turn immediately.
Week 5-6: Maturation
Reduce turning to once per week.
Temperature stabilizes around 30-40°C.
The material turns dark brown and smells earthy.
Quality Indicators to Watch
How do you know when it’s ready?
Look for these signs:
- Dark brown or black color
- Earthy smell (not ammonia)
- Temperature below 40°C
- Moisture around 30-40%
- pH between 6.5-7.5
Step 4: Processing and Packaging
Your compost is ready.
Now what?
Time to turn it into a marketable product.
Crushing and Screening
First, run everything through your crusher.
Target particle size: 3-5mm for powder, 10-20mm for mulch.
Then screen it.
Pro tip: Save the oversized particles. They make excellent mulch products.
Adding Value (Optional)
Want to charge premium prices?
Add these:
- Beneficial microorganisms
- Trace minerals
- Humic acid
- Seaweed extract
Mix thoroughly using a horizontal mixer for 5-10 minutes.
Packaging Options
Your packaging depends on your target market:
For Farmers: 50kg bags or bulk
For Gardeners: 5-25kg bags
For Landscapers: 40-50kg bags or bulk
Always include:
- NPK values
- Application instructions
- Manufacturing date
- Your contact info
Step 5: Quality Control and Testing
Here’s something most people skip:
Quality control.
Big mistake.
Essential Tests
At minimum, test for:
- NPK content
- Moisture level
- pH
- Heavy metals
- Pathogens (E. coli, Salmonella)
How often?
Test every batch initially.
Once consistent, test weekly.
Documentation
Keep records of:
- Raw material sources
- Processing dates
- Test results
- Customer feedback
Why bother?
Two reasons:
- Certification requirements
- Continuous improvement
Step 6: Legal Requirements and Certification
The boring (but crucial) stuff.
Basic Requirements
You’ll need:
- Business registration
- Environmental permits
- Organic certification (if claiming organic)
- Product registration
The exact requirements vary by location.
But these four are universal.
Organic Certification
Want to label your product “organic”?
You need certification.
The process typically takes 3-6 months and includes:
- Application
- Inspection
- Testing
- Annual reviews
Cost: $500-10,000 depending on operation size.
Worth it? Absolutely.
Certified organic fertilizer commands 20-50% higher prices.
Step 7: Marketing and Distribution
You’ve got great fertilizer.
Now you need customers.
Target Markets
Focus on these segments:
Large-scale organic farms: They buy in bulk and reorder frequently.
Garden centers: Steady demand, but want smaller packages.
Landscaping companies: High volume, especially spring and fall.
Direct to consumer: Higher margins but more work.
Pricing Strategy
Research your competition first.
Then price 10-20% below them initially.
Why?
You need to build trust first.
Once established, gradually increase prices to market rates.
Distribution Channels
Start local.
Seriously.
Build a strong base within 100km first.
Then expand regionally.
Going national? Partner with established distributors.
Common Mistakes to Avoid
I’ve seen dozens of fertilizer startups fail.
Here’s what they did wrong:
Mistake #1: Poor raw material management
Solution: Secure contracts with reliable suppliers before starting.
Mistake #2: Skipping the testing phase
Solution: Test everything. Multiple times.
Mistake #3: Overestimating initial demand
Solution: Start small. Scale based on actual sales.
Mistake #4: Ignoring regulations
Solution: Hire a consultant if needed. Compliance is non-negotiable.
Scaling Your Operation
Once profitable, it’s time to scale.
Phase 1: Increase Production (Months 6-12)
- Add second shift
- Upgrade equipment
- Hire specialized staff
Phase 2: Expand Product Line (Year 2)
- Granulated fertilizer
- Specialized blends
- Liquid fertilizer
Phase 3: Geographic Expansion (Year 3+)
- Regional distribution
- Multiple production sites
- Export opportunities
Real-World Success Story
Let me share a quick example:
A client in India started with just $50,000 investment in 2020.
Today?
They’re producing 500 tons monthly and cleared $400,000 in profit last year.
Their secret?
They focused on one thing: consistent quality.
No fancy marketing. No huge facility.
Just reliable, high-quality organic fertilizer.
The Bottom Line
Starting a commercial organic fertilizer operation isn’t rocket science.
But it does require:
- Proper planning
- Quality equipment
- Consistent processes
- Patience
Follow the steps in this guide, and you’ll be well on your way.
Remember: the organic fertilizer market is growing fast.
The sooner you start, the better positioned you’ll be.
So there you have it – everything you need to know about how to make organic fertilizer commercially.
The question is:
What’s stopping you from starting today?


