What is the production process of organic fertilizer? It’s actually way simpler than most people think. The process involves collecting organic waste, composting it properly, and then processing it into a usable product that plants love.
Here’s the deal:
Creating organic fertilizer isn’t rocket science. But there ARE specific steps you need to follow to turn waste into “black gold” for your soil.
In this guide, as a professional organic fertilizer production line manufacturer, I’ll walk you through the entire production process step-by-step. Plus, I’ll share some pro tips that commercial producers use to create high-quality organic fertilizer.
Let’s dive in.

Production Process of Organic Fertilizer
Raw Material Collection: Your Starting Point
First things first:
You need the right raw materials.
The good news? Organic fertilizer raw materials are EVERYWHERE. Seriously.
Here are the most common sources:
- Animal manure (chicken, cow, pig, sheep)
- Agricultural waste (crop residues, straw, rice hulls)
- Food processing waste (brewery waste, sugar residue)
- Plant materials (grass clippings, leaves, sawdust)
But here’s where most people mess up:
They grab whatever organic waste they can find and hope for the best.
That’s a mistake.
You want to be strategic about your raw material selection. Why? Because different materials have different nutrient profiles and decomposition rates.
For example, chicken manure is super high in nitrogen. But it’s also “hot” and can burn plants if not properly composted.
On the flip side, sawdust is high in carbon but low in nitrogen. It takes forever to break down on its own.
Pro tip: Mix materials with different carbon-to-nitrogen ratios. This speeds up decomposition AND creates a more balanced fertilizer.
Pre-Treatment: Setting Yourself Up for Success
Once you’ve collected your raw materials, you can’t just throw them in a pile and wait.
(Well, you COULD. But you’d be waiting a really long time.)
Instead, you need to prep your materials first:
Size Reduction
Big chunks of organic matter decompose slowly. Really slowly.
That’s why commercial producers run materials through shredders or grinders. The goal? Particles between 0.5-2 inches.
Smaller particles = more surface area for microbes to work on = faster composting.
Moisture Adjustment
This is HUGE.
Your compost pile needs the right moisture content to work properly. Too dry? The microbes can’t do their job. Too wet? You’ll get a stinky, anaerobic mess.
The sweet spot: 50-60% moisture content.
Here’s a simple test: Grab a handful of material and squeeze it. You should see a drop or two of water. But it shouldn’t be dripping wet.
C:N Ratio Balancing
Remember that carbon-to-nitrogen ratio I mentioned?
You want to aim for about 25-30:1 (carbon to nitrogen).
Too much carbon? Your compost will take forever.
Too much nitrogen? You’ll get a smelly pile that loses nutrients to the air.
Mix high-carbon materials (straw, sawdust) with high-nitrogen materials (manure, food waste) to hit that sweet spot.
The Composting Process: Where the Magic Happens
Now for the main event:
Composting is where microorganisms break down your organic materials into nutrient-rich humus.
There are several composting methods, but windrow composting is the most popular for commercial production.
Windrow Composting Setup
Picture this:
Long rows of compost material, about 6-8 feet tall and 10-12 feet wide.
These “windrows” allow for good air circulation while keeping the pile big enough to generate heat.
And heat is exactly what you want.
Temperature Management
Here’s what happens in a properly managed compost pile:
- Mesophilic phase (68-104°F): Microbes start breaking down simple compounds
- Thermophilic phase (104-160°F): Hot-loving bacteria take over, breaking down complex materials
- Cooling phase: Temperature drops as available food decreases
- Maturation phase: Final breakdown and stabilization
The thermophilic phase is critical. Why?
Those high temperatures (130-160°F) kill pathogens, weed seeds, and harmful bacteria.
Turning and Aeration
Oxygen is essential for aerobic composting.
That’s where compost turners come in.
These machines flip and mix your windrows, introducing fresh oxygen and ensuring even decomposition.
How often should you turn?
- First 2 weeks: Every 2-3 days
- Weeks 3-4: Every 4-5 days
- After that: Once a week
More frequent turning = faster composting. But it also means higher labor costs.
Monitoring Progress
You can’t just set it and forget it.
Successful composting requires regular monitoring:
- Temperature: Check daily with a compost thermometer
- Moisture: Test weekly and adjust as needed
- pH: Should be between 6.5-8.0
- Odor: Bad smells mean something’s wrong (usually too wet or not enough oxygen)
The entire composting process typically takes 6-12 weeks, depending on your materials and management.
Post-Composting Processing: From Rough to Refined
So you’ve got finished compost. Great!
But you’re not done yet.
Raw compost needs processing to become commercial-grade organic fertilizer.
Screening and Separation
First up: screening.
A rotary drum screen removes oversized particles, rocks, and any non-composted materials.
The ideal particle size for finished fertilizer? 2-4mm.
Anything bigger goes back for more composting or gets used as mulch.
Crushing and Grinding
Even after screening, you might have clumps or larger particles.
That’s where crushers come in.
High-moisture fertilizer crushers can handle material with up to 50% moisture content, breaking everything down to a uniform size.
Nutrient Enhancement (Optional)
Here’s a secret:
Many commercial producers boost their fertilizer’s nutrient content at this stage.
Common additions include:
- Rock phosphate (for phosphorus)
- Sulfate of potash (for potassium)
- Humic acid (for soil conditioning)
- Beneficial microbes
These additions turn good compost into GREAT fertilizer.
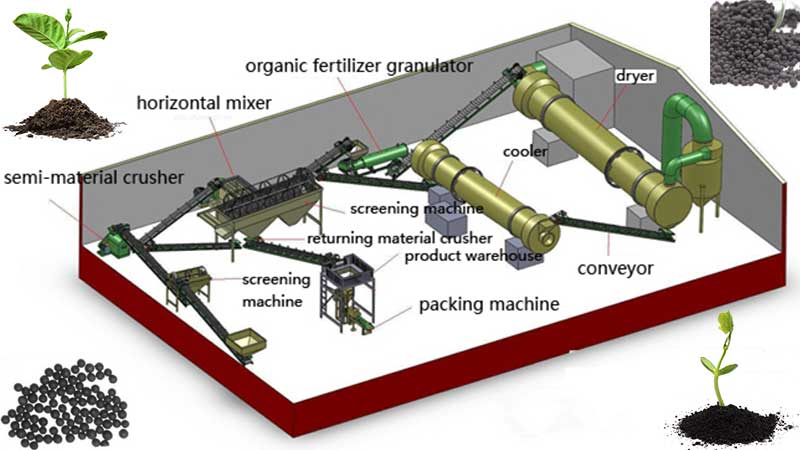
Granulation: The Game-Changer
Now we’re getting to the advanced stuff.
Granulation turns powdery compost into uniform pellets. And trust me, this makes a HUGE difference.
Why granulate?
- Easier to handle and apply
- Reduces dust
- Improves storage stability
- Allows for controlled nutrient release
Granulation Methods
There are three main approaches:
- Disc granulation: Material tumbles on a rotating disc while binders are added
- Drum granulation: Similar concept but uses a rotating drum
- Extrusion granulation: Forces material through dies to create pellets
Each method has pros and cons. But disc granulation is most popular for organic fertilizers.
The Granulation Process
Here’s how it works:
- Crushed compost enters the granulator
- Water or organic binders are sprayed on
- Material tumbles and forms small balls
- Balls grow larger as more material sticks
- Uniform granules exit the machine
The key is getting the moisture content just right. Too dry and nothing sticks. Too wet and you get mud balls.
Drying and Cooling
Fresh granules contain 20-30% moisture.
That’s too wet for storage.
So they go through a rotary dryer to bring moisture down to 10-15%.
But wait – now they’re hot!
A rotary cooler brings the temperature back down to ambient levels. This prevents moisture migration during storage.
Quality Control and Packaging
Almost there!
But before packaging, you need one more screening.
This final screen ensures all granules are the right size (typically 2-5mm).
Oversized granules? Back to the crusher.
Undersized? Back to the granulator.
Only perfectly sized granules make it to packaging.
Testing and Analysis
Quality organic fertilizer producers test every batch for:
- NPK content
- Organic matter percentage
- Heavy metals
- Pathogen levels
- pH
- Moisture content
This ensures consistency and safety.
Packaging Options
The final step: getting your fertilizer into bags.
Automatic packing machines can handle:
- 25kg bags for commercial users
- 5-10kg bags for home gardeners
- Bulk bags (500-1000kg) for large operations
Don’t forget proper labeling! Include:
- Nutrient analysis
- Application rates
- Organic certification (if applicable)
- Manufacturing date
Optimizing Your Production Process
Want to take your organic fertilizer production to the next level?
Here are some advanced tips:
Speed Up Composting
Add compost accelerators or inoculants. These concentrated microbe blends can cut composting time by 30-50%.
Improve Nutrient Retention
Cover your windrows during heavy rain. This prevents nutrient leaching and maintains proper moisture levels.
Reduce Labor Costs
Invest in automated turners and monitoring systems. The upfront cost pays off quickly in labor savings.
Scale Smartly
Start small and perfect your process before scaling up. It’s easier to fix problems in a 10-ton batch than a 100-ton batch.
Common Mistakes to Avoid
I’ve seen plenty of organic fertilizer operations fail.
Here are the biggest mistakes:
Mistake #1: Ignoring the C:N ratio
Result: Slow composting or nutrient loss
Mistake #2: Insufficient turning
Result: Anaerobic conditions and bad odors
Mistake #3: Wrong moisture levels
Result: Slow decomposition or pathogen survival
Mistake #4: Rushing the process
Result: Immature compost that can harm plants
Mistake #5: Poor quality control
Result: Inconsistent products and unhappy customers
The Bottom Line
What is the production process of organic fertilizer?
It’s a systematic approach that transforms organic waste into valuable soil amendments through careful composting, processing, and quality control.
The process isn’t complicated. But it does require attention to detail and proper equipment.
Follow the steps I’ve outlined, avoid the common mistakes, and you’ll produce organic fertilizer that plants (and gardeners) love.
Remember: great organic fertilizer starts with quality raw materials and proper composting. Everything else is just refinement.
Now you know exactly what goes into making commercial-grade organic fertilizer. Time to put this knowledge to work!