
Ever wonder what to do with all that chicken poop piling up in your coop?
Here’s the deal: is chicken manure good fertilizer? Absolutely. In fact, it’s one of the best organic fertilizers you can get your hands on. Gardeners literally call it “brown gold” for a reason.
But here’s the thing:
You can’t just shovel fresh chicken poop onto your tomatoes and call it a day. That’s a recipe for disaster (and dead plants).
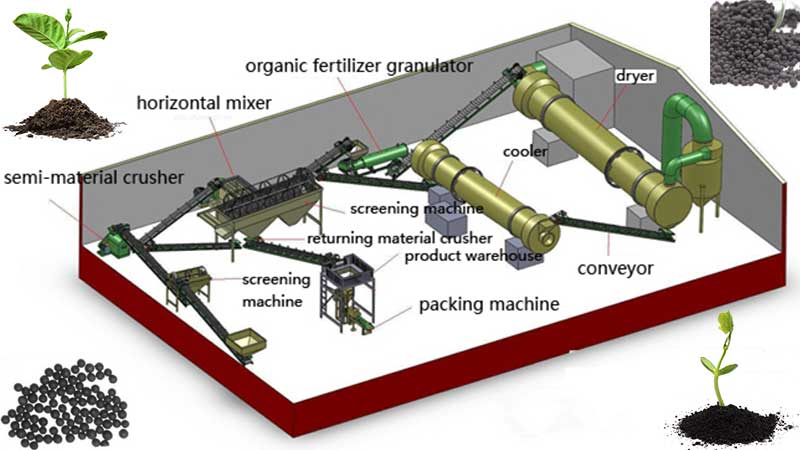
As a professional chicken manure organic fertilizer production line manufacturer, let me break down exactly why chicken manure rocks as a fertilizer, how to use it safely, and the specific steps to turn that smelly mess into garden gold.
Quick Summary
- Chicken manure is highly nutrient‑dense and excellent for improving soil when properly processed.
- Never apply fresh manure—hot composting (130–150°F, turned, cured) or 6+ months aging is required to kill pathogens and avoid plant burn.
- Apply about 20–30 lb per 100 sq ft (adjust by crop: heavy/moderate/light feeders) and follow 90/120‑day pre‑harvest rules for food crops.
- Common pitfalls: fresh use, over-application, wrong plant pairings (avoid on acid‑loving plants), and poor storage—cover piles and keep away from water.
Is Chicken Manure Good Fertilizer
Absolutely yes! Chicken manure is one of the most nutrient-dense organic fertilizers you can get your hands on. It has 2-3x more nitrogen, phosphorus, and potassium than cow or horse manure.

Why Chicken Manure Is a Fertilizer Powerhouse
First, let’s talk numbers.
Chicken manure crushes other animal manures when it comes to nutrients:
- Nitrogen (N): 4% (vs 1% in cow manure)
- Phosphorus (P): 2% (vs 1% in cow manure)
- Potassium (K): 1% (vs 1% in cow manure)
That’s literally 4x more nitrogen than cow manure. No wonder your plants go crazy for it.
But that’s not all.
Chicken manure also packs:
- Calcium (prevents blossom end rot in tomatoes)
- Magnesium
- Sulfur
- Beneficial microbes
Plus, it improves soil structure, water retention, and aeration. Pretty impressive for something that starts as poop, right?
The Dark Side of Fresh Chicken Manure
Now for the bad news.
Fresh chicken manure is hot. And I don’t mean temperature-wise.
It contains crazy high levels of ammonia and nitrogen that will literally burn your plants to a crisp. I’ve seen entire garden beds wiped out because someone thought fresh manure was a good idea.
(Spoiler: it’s not.)
Here’s what else makes fresh manure problematic:
Pathogen City
Raw chicken manure can harbor:
- E. coli
- Salmonella
- Cryptosporidium
Not exactly what you want on your lettuce, right?
pH Problems
Chicken manure tends to be alkaline (pH 6.5-8.0). Great for most veggies. Terrible for acid-loving plants like:
- Blueberries
- Azaleas
- Rhododendrons
Bottom line? Fresh manure needs serious processing before it’s garden-ready.
How to Turn Chicken Poop into Black Gold
So how do you transform toxic waste into garden treasure?
Two words: composting and aging.
Method #1: Hot Composting (The Fast Track)
This is my preferred method because it actively kills pathogens.
Here’s the step-by-step:
- Mix Your Materials
- 1 part manure/bedding
- 2 parts carbon-rich “browns” (leaves, straw, wood chips)
- Build Your Pile
- Minimum 3x3x3 feet (1 cubic yard)
- Add water until it feels like a wrung-out sponge
- Monitor Temperature
- Should hit 130-150°F within days
- Maintain for 3 days minimum
- Use a compost thermometer (best $20 you’ll spend)
- Turn and Repeat
- After cooling, pull apart center
- Move core to edges, edges to core
- Repeat 3 times minimum
- Cure It
- Let sit 45-60 days
- Ready when dark, crumbly, and earthy-smelling
Total time: 3-4 months
Method #2: Aging (The Lazy Way)
Don’t want to babysit a compost pile? I get it.
Simple aging works too:
- Pile manure in protected area
- Keep dry (cover from rain)
- Wait 6+ months
- Apply to garden
Pro tip: Spread manure on a tarp to sun-dry first. Kills smell AND speeds decomposition.
Application Guidelines That Actually Work
Alright, your manure is composted. Now what?
How Much to Use
General rule: 20-30 pounds per 100 square feet
But here’s my approach:
- Heavy feeders (tomatoes, corn): 30 lbs
- Moderate feeders (peppers, squash): 20 lbs
- Light feeders (herbs, lettuce): 10-15 lbs
- Root crops: Go easy (too much = all leaves, no roots)
When to Apply
Timing is everything:
Fall application (my favorite):
- Nutrients break down over winter
- Ready for spring planting
- Zero burn risk
Spring application:
- Apply 2-3 weeks before planting
- Must be fully composted
- Work into soil, don’t leave on surface
The 90/120 Day Rule
If you’re growing food, follow these safety guidelines:
- 90 days before harvest: Crops with no soil contact (trellised tomatoes, beans)
- 120 days before harvest: Ground contact crops (lettuce, strawberries, carrots)
Why? Pathogen die-off insurance.
Store-Bought vs. DIY: Which Is Better?
Look, not everyone has chickens. Or wants to compost poop.
Good news: bagged chicken manure works great too.
Commercial Pellets
Pros:
- Pre-sterilized
- No smell
- Consistent NPK
- Apply anytime
Cons:
- More expensive
- Less organic matter
- May contain additives
Fresh Farm Manure
Pros:
- Free/cheap
- Loads of organic matter
- Higher nutrient variability
Cons:
- Must compost yourself
- Pathogen risk
- Smell factor
- Storage headaches
My take? If you’re just starting out, buy pellets. Once you’re comfortable, graduate to the real deal.
Common Chicken Manure Mistakes (And How to Avoid Them)
I see these errors all the time:
Mistake #1: Using Fresh Manure
The problem: Plant burnout, pathogen exposure
The fix: Always compost or age first. No exceptions.
Mistake #2: Over-Application
The problem: Nitrogen overload, huge leaves, no fruit
The fix: Less is more. Start with half recommended amount.
Mistake #3: Wrong Plant Pairings
The problem: Killing acid-lovers with alkaline manure
The fix: Save chicken manure for veggies. Use pine needles for blueberries.
Mistake #4: Poor Storage
The problem: Runoff contamination, angry neighbors
The fix: Cover piles, ensure drainage, keep away from water sources
Chicken Manure Success Stories
Let me share what proper chicken manure use looks like.
I helped a friend transform her struggling vegetable garden using aged chicken manure. Here’s what happened:
- Tomato yields: Up 40%
- Soil structure: From clay to loam in 2 seasons
- Water needs: Down 25%
- Overall health: Night and day difference
The secret? She followed the composting process religiously and applied conservatively.
Advanced Tips for Power Users
Ready to level up? Try these pro strategies:
The Chicken Tractor Method
Move chickens through garden beds in fall. They:
- Eat pests and weeds
- Deposit manure directly
- Till soil with scratching
By spring, beds are perfect.
Manure Tea
- Fill burlap sack with aged manure
- Soak in barrel of water (1:5 ratio)
- Steep 24-48 hours
- Dilute 1:10 for foliar feeding
Plants absorb nutrients instantly.
Layered Composting
Instead of mixing, try:
- 2″ manure
- 4″ browns
- Repeat
- Turn monthly
Faster breakdown, better aeration.
The Bottom Line on Chicken Manure
So, is chicken manure good fertilizer?
You bet it is. When properly composted, it’s hands-down one of the best organic fertilizers available. Higher nutrients than other manures, improves soil structure, and it’s basically free if you have chickens.
Just remember:
- Never use fresh
- Compost or age 6+ months
- Follow safety timelines for food crops
- Start with less, add more if needed
Get this right, and your garden will thank you with the best harvest you’ve ever seen.
Your plants are hungry. Time to feed them some brown gold.


 English
  Spanish
  French
  Russian
  German
  Italian
  Turkish