Ever wondered how liquid NPK fertilizers are made?
Here’s the thing: the liquid NPK fertilizer manufacturing process isn’t as complicated as most people think. In fact, once you understand the basics, you can even produce your own custom blends.
I’ve spent years studying fertilizer production methods. And today, as a professional fertilizer production line manufacturer, I’m going to break down exactly how liquid NPK fertilizers are manufactured – from raw materials to the finished product sitting in your storage tank.
Sound good? Let’s dive in.
What Makes Liquid NPK Different?
Before we jump into the manufacturing process, let’s get one thing straight:
Liquid NPK fertilizers are NOT just dissolved granular fertilizers.
(That’s a common misconception.)
Instead, they’re specifically formulated solutions or suspensions designed to stay stable in liquid form. This means they won’t crystallize in your tank or clog your spray nozzles.
The benefits?
- Instant availability to plants
- Uniform application through irrigation systems
- Custom blending capabilities
- No dust or granule segregation issues
But here’s the catch: you need to know the right manufacturing process to get these benefits.
Liquid NPK Fertilizer Manufacturing Process: Two Main Methods
When it comes to liquid NPK production, you’ve got two options:
- Cold Mix Process (Blending)
- Hot Mix Process (Neutralization)
Each has its pros and cons. Let me break them down for you.
Cold Mix Process: The Simpler Approach
Think of cold mixing like making lemonade. You’re essentially dissolving ingredients in water without any chemical reactions.
Best for:
- Small to medium-scale operations
- Custom formulations
- Lower startup costs
Here’s exactly how it works:
Step 1: Water Preparation
Start with clean water. And I mean CLEAN. High calcium or magnesium content will cause precipitation problems later.
(Pro tip: Test your water source first. It’ll save you headaches down the road.)
Step 2: Set Up Your Mixing Tank
You’ll need a stainless steel tank with a high-speed agitator. Why stainless steel? Because fertilizers are corrosive. Regular steel won’t last.
Step 3: Add Ingredients in the Right Order
This is crucial. Here’s the sequence I recommend:
- Fill tank with water (about 70% of final volume)
- Start agitation to create a vortex
- Add nitrogen sources (urea, UAN solution, or ammonium sulfate)
- Add potassium sources (white potash or potassium nitrate)
- Finally, add phosphorus sources (APP 10-34-0 or soluble MAP)
Why this order?
Nitrogen salts absorb heat when dissolving. This cools your mixture and can prevent other ingredients from dissolving properly. By adding them first, you avoid this issue.
Step 4: Manage Temperature
Here’s where many manufacturers mess up:
When urea dissolves, it drops the water temperature significantly. Sometimes below 32°F!
The solution? Use warm water or install heating coils in your tank.
Step 5: Filter the Solution
Run your liquid through an 80-100 mesh filter. This removes any undissolved particles that could clog equipment later.
Hot Mix Process: The Industrial Method
Now, if you’re looking to produce base liquids like 10-34-0 at scale, you’ll need the hot mix process.
Warning: This method involves serious chemistry and safety considerations.
Here’s how it works:
Step 1: Prepare Your Reactor
You’ll need a specialized reactor vessel designed to handle:
- High temperatures (up to 212°F)
- Corrosive materials
- Violent chemical reactions
Step 2: The Neutralization Reaction
Pump phosphoric acid and ammonia into the reactor. They react to form ammonium phosphate, releasing intense heat.
The reaction looks like this:
- Phosphoric acid + Ammonia → Ammonium phosphate + HEAT
Step 3: Control pH Carefully
Maintain pH between 6.0-6.5. Too low? Your product becomes corrosive. Too high? Ammonia gas escapes.
Step 4: Cool the Product
The liquid comes out HOT. You’ll need heat exchangers to bring it down to safe storage temperatures.
Clear Liquid vs. Suspension: Which Should You Make?
This is a critical decision in your manufacturing process.
Clear Liquids (Solutions)
These are completely dissolved fertilizers. Think of them like sugar water – everything is in solution.
Advantages:
- Easy to apply through any irrigation system
- No settling issues
- Longer shelf life
Disadvantages:
- Lower nutrient concentrations
- Limited by solubility constraints
Typical grades: 3-18-18, 7-21-7, 9-18-9
Suspension Fertilizers
These contain suspended particles held in place by clay agents.
Advantages:
- Higher nutrient concentrations
- Can incorporate micronutrients easily
- Better economics per unit of nutrient
Disadvantages:
- Requires constant agitation
- More complex manufacturing
- Shorter shelf life
Typical grades: 14-14-14, 10-30-10, 12-24-12
(The choice depends on your market and equipment capabilities.)
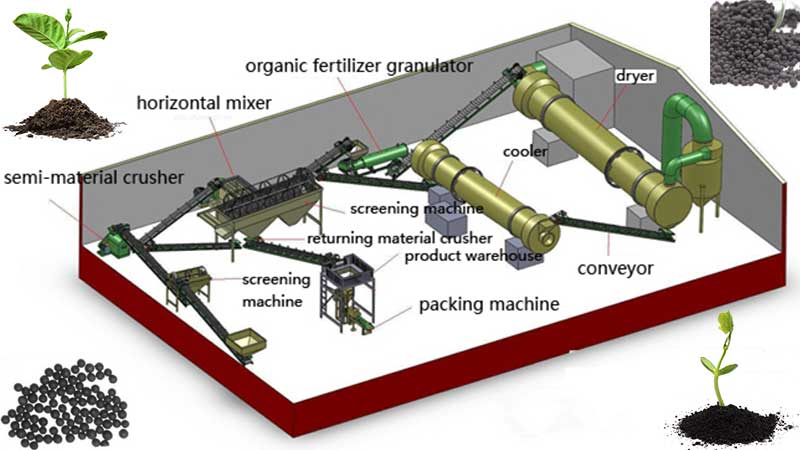
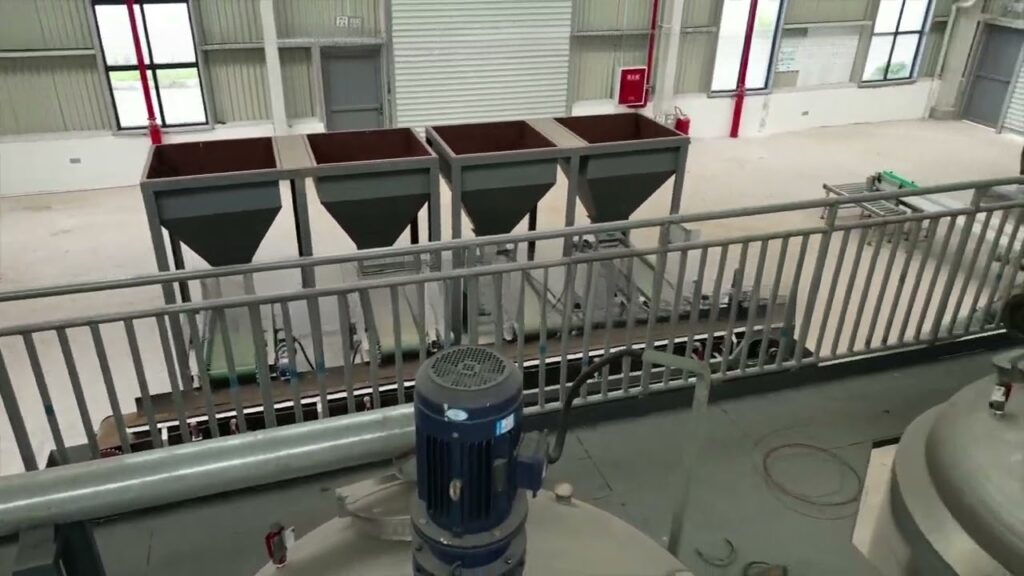
Essential Equipment for Liquid NPK Manufacturing
Let’s talk equipment. Here’s what you’ll actually need:
Must-Have Equipment
- Stainless Steel Mixing Tanks
- 304 or 316 grade minimum
- Conical bottom for complete drainage
- Capacity based on your production needs
- Agitation System
- High-shear mixer for solutions
- Paddle or ribbon blender for suspensions
- Pumping System
- Centrifugal pumps for transfer
- Diaphragm pumps for precise dosing
- Filtration Equipment
- Basket strainers or self-cleaning filters
- 80-100 mesh for clear liquids
- 40-60 mesh for suspensions
- Temperature Control
- Steam injection or hot water system
- Critical for urea-based formulas
Quality Control Equipment
Don’t skimp here. You need:
- pH meter
- Specific gravity tester
- Thermometer
- Conductivity meter
Critical Quality Parameters to Monitor
Quality control separates professional operations from backyard blenders.
Here’s what to track:
Salting-Out Temperature
This is the temperature at which crystals start forming. Different formulas have different limits:
- 10-34-0: Stable to 0°F
- High potash blends: May crystallize at 40°F
- Urea-based products: Vary widely
Pro tip: Always test your formula’s salting-out temperature before full production.
pH Management
Keep pH between 6.0-7.0 for most formulations. Why?
- Below 6.0: Corrosion issues
- Above 7.0: Ammonia volatilization
- Sweet spot: 6.5
Specific Gravity
This tells you if your nutrient concentration is correct. Each formula has a target specific gravity. Miss it, and you’re either giving away product or shorting your customers.
Common Manufacturing Problems (And How to Fix Them)
Let me save you some trouble. Here are issues I’ve seen repeatedly:
Problem 1: Crystallization in Storage
Cause: Temperature drops below salting-out point
Solution:
- Insulate storage tanks
- Install circulation systems
- Reformulate for better cold stability
Problem 2: Precipitation During Mixing
Cause: Wrong mixing order or incompatible ingredients
Solution:
- Follow the mixing sequence I outlined earlier
- Check water quality
- Consider chelating agents
Problem 3: Inconsistent Product Quality
Cause: Poor mixing or inadequate quality control
Solution:
- Increase mixing time
- Install inline mixing systems
- Test every batch
Advanced Manufacturing Tips
Want to take your liquid NPK production to the next level? Here’s what separates the pros from the amateurs:
Tip 1: Use Polyphosphates
Instead of regular phosphoric acid, use superphosphoric acid. It creates polyphosphates that:
- Sequester impurities
- Improve cold weather stability
- Enhance micronutrient compatibility
Tip 2: Add Stability Agents
A small amount (0.1-0.5%) of certain polymers can:
- Prevent crystallization
- Improve suspension stability
- Extend shelf life
Tip 3: Optimize Your Water
Pre-treat your water to remove:
- Calcium and magnesium (causes precipitation)
- Iron (causes discoloration)
- Bicarbonates (raises pH)
Setting Up Your Production Line
Ready to start manufacturing? Here’s your step-by-step setup guide:
Step 1: Determine Your Scale
- Small (1-5 m³/hour): Manual batching okay
- Medium (5-15 m³/hour): Semi-automated recommended
- Large (15+ m³/hour): Full automation required
Step 2: Design Your Layout
- Raw material storage area
- Mixing/reaction area
- Quality control lab
- Finished product storage
- Loading/unloading zone
Step 3: Install Safety Systems
- Eye wash stations
- Emergency showers
- Containment systems
- Ventilation (especially for ammonia)
Step 4: Develop Standard Operating Procedures
Document everything:
- Mixing sequences
- Quality control checks
- Safety protocols
- Troubleshooting guides
The Economics of Liquid NPK Manufacturing
Let’s talk money. Because that’s what matters, right?
Startup Costs
Small Operation (1-5 m³/hour):
- Equipment: $50,000-150,000
- Installation: $20,000-50,000
- Working capital: $30,000-50,000
Medium Operation (5-15 m³/hour):
- Equipment: $150,000-500,000
- Installation: $50,000-150,000
- Working capital: $100,000-200,000
Operating Margins
Typical margins range from 15-35%, depending on:
- Raw material costs
- Local market prices
- Production efficiency
- Product complexity
The secret to higher margins?
Specialty formulations. Custom blends for specific crops or soil conditions command premium prices.
Future Trends in Liquid NPK Manufacturing
The industry is evolving fast. Here’s what’s coming:
Trend 1: Enhanced Efficiency Fertilizers
Manufacturers are adding:
- Nitrogen stabilizers
- Urease inhibitors
- Nitrification inhibitors
These increase nutrient use efficiency by 20-30%.
Trend 2: Biostimulant Integration
The next generation of liquid NPK will include:
- Humic acids
- Amino acids
- Beneficial microbes
Trend 3: Precision Formulation
Using soil testing data and crop models to create ultra-specific formulations for individual fields.
Getting Started: Your Action Plan
Ready to jump into liquid NPK manufacturing? Here’s your roadmap:
- Research your local market
- What formulations are in demand?
- What are competitors charging?
- What’s missing from current offerings?
- Start small with cold mixing
- Lower investment
- Easier to learn
- Flexibility to pivot
- Focus on quality from day one
- Invest in good testing equipment
- Document your processes
- Build a reputation for consistency
- Scale strategically
- Reinvest profits into better equipment
- Expand your product line gradually
- Consider contract manufacturing initially
The Bottom Line
The liquid NPK fertilizer manufacturing process isn’t rocket science. But it does require attention to detail, quality equipment, and a solid understanding of the chemistry involved.
Whether you choose cold mixing for flexibility or hot mixing for scale, success comes down to three things:
- Following proven processes
- Maintaining strict quality control
- Understanding your market’s needs
Start with the basics I’ve outlined here. Master them. Then expand into more complex formulations as you gain experience.
If you are looking for a NPK fertilizer production line manufacturer, we will be your best choice.
Remember: every major liquid fertilizer manufacturer started exactly where you are now. The difference? They took action.
Your move.