
Ever wondered how those perfect little fertilizer pellets are made?
Here’s the deal:
The fertilizer granulation process transforms messy powder into uniform granules that won’t blow away in the wind or cake up in storage. And if you’re in the fertilizer business (or thinking about getting into it), understanding this process is absolutely critical.
In fact, granulated fertilizers account for over 90% of the global fertilizer market. That’s a $193 billion industry we’re talking about.
Today, as a professional fertilizer granulator machine manufacturer, I’m going to break down exactly how fertilizer granulation works, the different methods available, and which one makes the most sense for your operation.
Sound good? Let’s dive in.

What Is Fertilizer Granulation (And Why Should You Care)?
Fertilizer granulation is the process of converting fine powder or liquid raw materials into solid, uniform pellets.
But here’s the thing:
It’s not just about making fertilizer look pretty. Granulation solves HUGE problems that plague the fertilizer industry.
Think about it:
- Powder fertilizers blow away (farmers lose up to 30% to wind drift)
- Different nutrients separate during transport (hello, uneven application)
- Storage becomes a nightmare (ever seen fertilizer turn into concrete blocks?)
That’s why smart manufacturers turn their powders into granules.
The benefits? They’re pretty impressive:
- Zero segregation – All nutrients locked in one pellet
- Precise application – Mechanical spreaders work 10x better
- Extended release – Nutrients release gradually over weeks
- Better economics – Less product waste = higher profits
The Two Main Granulation Methods
When it comes to fertilizer granulation, you’ve got two main options: wet granulation and dry granulation.
Let me break down each one.
Wet Granulation: The Industry Standard
Wet granulation uses water, steam, or liquid binders to stick particles together.
Think of it like making a snowball. You need moisture to get the snow to stick together, right? Same principle here.
The process looks like this:
- Mix your raw materials (NPK sources, fillers, etc.)
- Add liquid binder while materials tumble in a drum or disc
- Particles snowball into larger granules
- Dry the wet granules to <2% moisture
- Cool and coat for storage
Best for:
- High-volume operations (think 50,000+ tons/year)
- Chemical fertilizers like DAP, MAP, and NPK blends
- When you need super-strong, round granules
Popular equipment:
- Rotary drum granulator (the workhorse of large plants)
- Disc pan granulator (great for smaller operations)
- Spray towers (specifically for urea production)
Dry Granulation: The Efficient Alternative
Now, dry granulation takes a completely different approach.
No water. No drying. Just pure mechanical pressure.
Here’s how it works:
- Feed powder between high-pressure rollers
- Material gets compressed into dense sheets
- Break sheets into granules
- Screen to size (done!)
Best for:
- Heat-sensitive materials
- Small to medium-scale production
- When energy costs are a concern (no drying = 40% energy savings)
Main equipment:
- Double roller press granulator
- Compactor machines
Pro tip: If you’re just starting out or working with specialty fertilizers, dry granulation often makes more financial sense.
Fertilizer Granulation Process: Step-By-Step
Let me walk you through exactly how a typical fertilizer granulation line operates.
(This is based on a standard 100,000 ton/year NPK plant I recently consulted for.)
Step 1: Raw Material Preparation
First things first:
You need to get your ingredients right.
- Crush oversized materials to <2mm
- Weigh each component precisely (±0.5% accuracy)
- Pre-mix dry ingredients in a high-speed blender
Critical point: Moisture content should be 3-5% for most formulations. Too dry? Poor granulation. Too wet? Equipment clogs.
Step 2: The Actual Granulation
This is where the magic happens.
In a rotary drum granulator:
- Material enters the rotating cylinder
- Steam or water sprays create the right moisture
- Rolling action forms spherical granules
- Residence time: 15-20 minutes
In a disc pan granulator:
- Material feeds onto an inclined, rotating disc
- Water sprays from above
- Centrifugal force classifies granules by size
- Smaller particles stay in longer to grow
Step 3: Drying (For Wet Granulation Only)
Fresh granules contain 15-25% moisture. That’s way too high.
The solution? A rotary dryer.
- Hot air (250-300°C) enters the drum
- Granules tumble through for 20-30 minutes
- Exit moisture: 1-2%
- Exit temperature: 70-80°C
Important: Don’t over-dry. You’ll get dusty, weak granules.
Step 4: Cooling and Coating
Hot granules straight from the dryer? They’ll cake up faster than pancakes on a griddle.
That’s why we cool them:
- Ambient air reduces temperature to <40°C
- Takes about 10-15 minutes
- Prevents moisture migration in storage
Then comes the coating:
- 2-3% anti-caking oil prevents clumping
- Polymer coatings for controlled release (optional)
- Colorants for product differentiation
Step 5: Screening and Recycling
Not all granules come out perfect. That’s normal.
Here’s what happens:
- On-spec (2-4mm): Straight to packaging
- Oversize: Crushed and recycled
- Fines (<2mm): Back to the granulator as “seed” material
Smart plants recycle 20-30% of production. It’s not waste – it’s efficiency.
Equipment Selection: Making the Right Choice
Choosing granulation equipment is like picking a car. You need to match the specs to your needs.
Let me break down your main options:
Rotary Drum Granulator
We offer high-quality rotary drum granulator, click here to view: Rotary Drum Granulator
The facts:
- Capacity: 1-30 tons/hour
- Best for: Large-scale NPK, DAP, MAP production
- Investment: $100,000-$500,000
Why it’s popular:
- Handles chemical reactions inside the drum
- Flexible with different formulas
- Proven technology (50+ years)
The downside:
- High energy consumption
- Requires skilled operators
- Big footprint
Disc Pan Granulator
Click here to view our related product: Disc Granulator
The facts:
- Capacity: 0.5-6 tons/hour
- Best for: Organic fertilizers, smaller operations
- Investment: $20,000-$100,000
Advantages:
- Visual control of granulation
- Lower investment
- Easier to operate
Limitations:
- Lower capacity
- Open system (dust issues)
- Limited formula flexibility
Double Roller Granulator
Click here to view our related product: Double Roller Granulator
The facts:
- Capacity: 1-2 tons/hour
- Best for: Dry granulation, compound fertilizers
- Investment: $30,000-$80,000
Why choose it:
- No drying needed (huge energy savings)
- Compact design
- Simple operation
Trade-offs:
- Flat/irregular shaped granules
- Limited binder options
- Lower granule strength
Common Granulation Problems (And How to Fix Them)
Even experienced operators run into issues. Here’s how to troubleshoot:
Problem 1: Poor Granulation Rate
Symptoms: Too many fines, low yield
Solutions:
- Check moisture content (aim for 25-30% in granulator)
- Adjust binder amount (±2-3%)
- Increase residence time
- Verify raw material particle size
Problem 2: Granules Too Soft
Symptoms: High breakage, dust generation
Fix it by:
- Reducing dryer temperature
- Adding strengthening agents (bentonite)
- Optimizing moisture content
- Checking formula ratios
Problem 3: Caking in Storage
Prevention:
- Cool to <5°C above ambient
- Apply anti-caking coating
- Control storage humidity (<50%)
- Use proper packaging
Advanced Tips for Optimizing Your Process
After working with dozens of fertilizer plants, here are my top optimization strategies:
1. Master Your Formula
The #1 factor in successful granulation? Your formula.
Key rules:
- Minimum 40% “sticky” materials (MAP, DAP, urea)
- 35%+ dispersive materials (KCl, K₂SO₄)
- Keep moisture-sensitive ingredients <20%
2. Control Your Variables
Track these parameters religiously:
- Granulator moisture: ±1%
- Temperature profiles: ±5°C
- Retention times: ±2 minutes
- Product size distribution
Small variations = big quality swings.
3. Optimize Your Recycle Loop
Here’s something most people miss:
Your recycle ratio affects EVERYTHING.
- Too low (<15%): Poor granulation
- Too high (>40%): Capacity drops
- Sweet spot: 20-30%
4. Invest in Automation
Modern plants use:
- Automatic moisture control
- Real-time particle size analysis
- PLC-based process control
ROI? Usually under 18 months.
Special Considerations for Different Fertilizer Types
Not all fertilizers granulate the same way. Let me break down the specifics:
NPK Compound Fertilizers
- Use rotary drums for flexibility
- Steam injection improves reactions
- Typical formulas: 15-15-15, 20-20-20
- Key: Balance your N-P-K sources
Organic Fertilizers
- Must be composted first (15-20 days)
- Higher moisture tolerance
- Disc granulators work great
- Add 5-10% binder for strength
Single Super Phosphate (SSP)
- React rock phosphate + sulfuric acid first
- Cure for proper conversion
- Granulate with 20-25% moisture
- Critical: Control fluorine emissions
Urea Granulation
- Requires specialized prilling towers or fluid bed
- Melt urea → spray → solidify
- Temperature control is crucial
- Anti-caking treatment essential
The Economics: What’s This Going to Cost?
Let’s talk money.
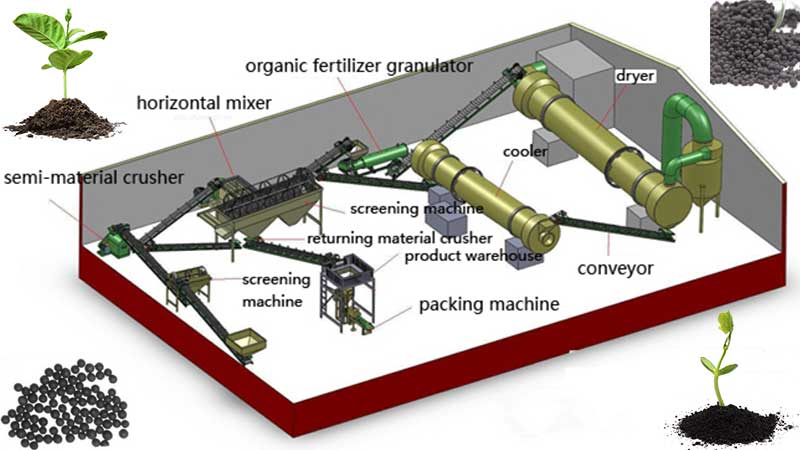
A complete granulation line includes:
- Mixing equipment
- Granulator
- Dryer and cooler
- Screening system
- Coating equipment
- Conveyors and controls
Small plant (10,000 tons/year):
- Investment: $500,000-$1 million
- Operating cost: $15-20/ton
- ROI: 2-3 years
Large plant (100,000 tons/year):
- Investment: $5-10 million
- Operating cost: $8-12/ton
- ROI: 3-5 years
Pro tip: Start with used equipment for 40-60% savings. Upgrade as you grow.
Environmental Considerations
Modern fertilizer plants must address:
Dust Control
- Bag filters at transfer points
- Enclosed conveyors
- Proper ventilation
- Regular maintenance
Emissions Management
- Scrubbers for ammonia
- Cyclones for particulates
- Heat recovery systems
- Continuous monitoring
Waste Minimization
- Recycle all off-spec material
- Recover process water
- Use waste heat for drying
- Optimize formulas to reduce waste
Future Trends in Granulation Technology
The industry’s evolving fast. Watch for:
- Smart granulation: AI-controlled processes
- Sustainable binders: Bio-based alternatives
- Custom nutrition: Precision-blended granules
- Nano-coatings: Ultra-controlled release
- Energy recovery: Zero-waste plants
Making Your Decision
So which granulation method should you choose?
Go with wet granulation if:
- You need high capacity (>50,000 tons/year)
- Product quality is critical
- You have experienced operators
- Energy costs are manageable
Choose dry granulation if:
- You’re starting small
- Energy efficiency matters
- You need simple operation
- Your materials are heat-sensitive
The bottom line?
Understanding the fertilizer granulation process isn’t just about making pellets. It’s about choosing the right technology, optimizing your operation, and delivering products that actually help farmers grow more food.
Whether you’re planning a new plant or improving an existing one, mastering these fundamentals will set you up for success in the competitive fertilizer market.


 English
  Spanish
  French
  Russian
  German
  Italian
  Turkish